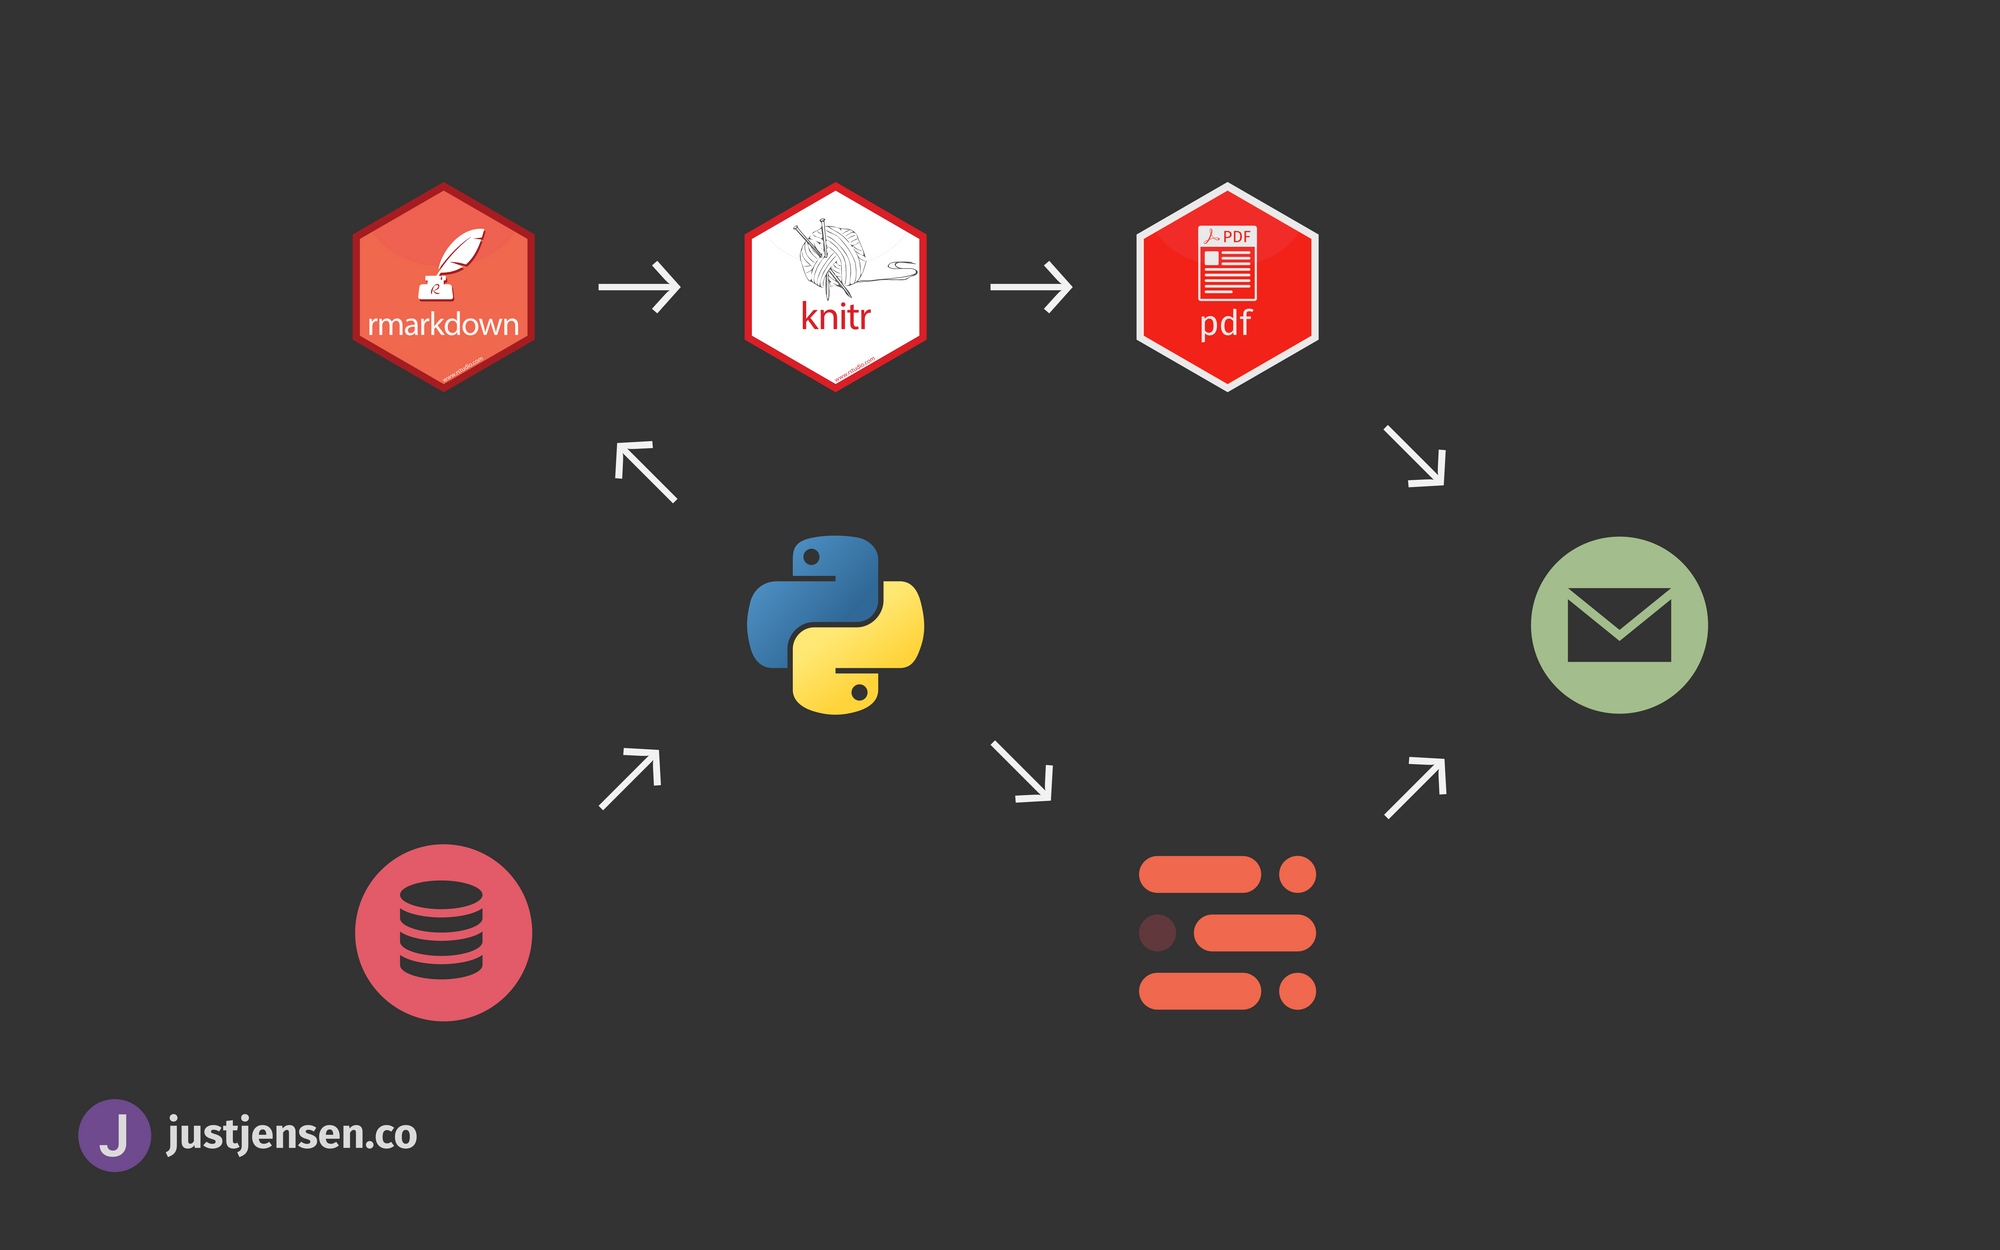
Reporting Data 102: Auto-Emailing Reports with Python, MJML, and Gmail
Relying on humans with busy schedules to spend time each day sending recurring emails is going to lead to missed emails and errors. Automate them instead!
In Reporting Data 101, we learned how to autogenerate a clean and professional PDF report from an RMarkdown document. If you work on a small team though, you'll also know that each small request for a recurring email can easily turn into 30 or 40 emails. Even if it only amounts to 20 or 30 minutes, relying on humans with busy schedules to spend that time each day is going to lead to missed emails and errors.
Before we go forward, I'll be transparent and give credit for much of this to the tutorial here: https://realpython.com/python-send-email/
Just want to see example code? Check out the example repository on Github: https://github.com/Danishswag/automated-mjml-email
Table of Contents
- Sending a Basic Test Email
a. Sending a Simple HTML Email
b. Graduating to Gmail - Attaching Files before Sending
- Using Templates to Present a Polished Front
a. Personalizing the Template and Sending with Python
b. Including the Logo as an Attachment - Final Thoughts
Sending a Basic Test Email
Let's start by setting up a debugging server running locally so that we don't have to mess around with any external services (yet). Open up a new terminal prompt and run this command:
python -m smtpd -c DebuggingServer -n localhost:1025In a separate terminal or script, we can now get started on sending an email. Start out by importing smtplib, setting up your server, and defining some basic info.
import smtplib

# Set up the server info
smtp_server = 'localhost'
port = 1025

# Setting up a basic message
sender_email = 'frodo@theshire.com'
receiver_email = 'samwise@theshire.com'
message = "They're taking the hobbits to Isengard!"
With our email addresses and message content set up, we can actually send an email!
with smtplib.SMTP(smtp_server, port) as local_server:
    local_server.sendmail(sender_email, receiver_email, message)
If you run the script above, you should see the output below from your debugging server!
---------- MESSAGE FOLLOWS ----------
b"They're taking the hobbits to Isengard!"
------------ END MESSAGE ------------
Sending a Simple HTML Email
Even if you are just emailing a family member, a plain text email might be a little too plain—just bolding and italicizing text still requires HTML. To include any extra markup, we'll need to send a MIME multipart email. If you want to learn more about MIME, you can check out the Wikipedia page, but for the most part it is a standard that allows you to include more than basic ASCII characters in your emails.
To send a MIME-formatted email, we'll need to use the email.mime module. Once again, let's set up a basic message and send it, this time with some bolded text and a hyperlink.
from email.mime.multipart import MIMEMultipart
from email.mime.text import MIMEText

message = MIMEMultipart('mixed')
message['Subject'] = 'We know where the hobbits are going!'
message["From"] = sender_email
message["To"] = receiver_email

html = """\
<html>
  <body>
    <p><strong>The</strong> hobbits are going to <a href="https://www.google.com/maps/search/isengard/">Isengard!</a><br>
       -Legolas
    </p
  </body>
</html>
"""

message.attach(MIMEText(html, "html"))

with smtplib.SMTP(smtp_server, port) as local_server:
    local_server.sendmail(sender_email, receiver_email, message.as_string())
Using the MIME Multipart standard, not only can we include HTML, we can also define the email subject, and what should show up in the From/To fields. If you run the script above and everything goes according to plan, you should get the message below.
---------- MESSAGE FOLLOWS ----------
b'Content-Type: multipart/mixed; boundary="===============5974013959706912276=="'
b'MIME-Version: 1.0'
b'Subject: We know where the hobbits are going!'
b'From: frodo@theshire.com'
b'To: samwise@theshire.com'
b'X-Peer: ::1'
b''
b'--===============5974013959706912276=='
b'Content-Type: text/html; charset="us-ascii"'
b'MIME-Version: 1.0'
b'Content-Transfer-Encoding: 7bit'
b''
b'<html>'
b'  <body>'
b'    <p><strong>The</strong> hobbits are going to <a href="https://www.google.com/maps/search/isengard/">Isengard!</a><br>'
b'       -Legolas'
b'    </p'
b'  </body>'
b'</html>'
b''
b'--===============5974013959706912276==--'
------------ END MESSAGE ------------
Graduating to Gmail
While the debugging server in the terminal was good enough to get a feel for how smtplib and email.mime work, it'll be easier to use a more traditional email provider to test out attaching a document and using a an email template.
Gmail still supports SMTP on free accounts, but I recommend creating a new account rather than using your primary account since sending emails automatically using SMTP from an unauthorized app (this Python script) requires enabling Less Secure App Access. Once we have a testing account ready to go though, the script only needs a few small changes to make it work with Gmail.
import ssl
from getpass import getpass  # use getpass to avoid the terminal keeping your
                             # password in the prompt history

# Set up gmail info, modifying for our "real" gmail account
gmail_username = 'hobbit.notification.service@gmail.com'
gmail_password = getpass('Enter the Hobbit Notification Gmail Password:')
port = 465
gmail_smtp_url = 'smtp.gmail.com'

# Create a secure SSL context so you know your email is encrypted on the way to the server
context = ssl.create_default_context()

# Send the same test email as before, but through gmail to a "real" gmail account!
receiver_email = "justjensen.real.email@gmail.com"
with smtplib.SMTP_SSL(gmail_smtp_url, port, context=context) as gmail_server:
    gmail_server.login(gmail_username, gmail_password)
    gmail_server.sendmail(
        gmail_username, receiver_email, message.as_string()
    )
You'll know it worked if you receive the test email we set up previously! If you just need an alert email to let you know when your daily data processing is done or that one of your web services has gone down, you might not need anything else. However, if you want to attach a log file to your alert, or if you want to attach a report and make the email look polished for end users, then we need to do a little more.
Attaching Files Before Sending
As an example, let's attach the PDF report we made in Reporting Data 101 (which you can also download directly from GitHub) to the email before sending it.
Since the early days of email involved simply sending text, we need to encode the file to ASCII characters using the Base64 algorithm before sending it. Most email providers do this under the surface, but since we are preparing the full email directly in Python, we also need to handle this part too. Let's start by setting up our additional imports and getting the file ready.
from email import encoders
from email.mime.base import MIMEBase
from pathlib import Path

# Preparing the attachment
pdf_to_attach = Path() / 'Parking-Violations-Issued-in-January-2020.pdf'
attachment_part = MIMEBase("application", "octet-stream")
attachment_part.set_payload(pdf_to_attach.read_bytes())
encoders.encode_base64(attachment_part)
To help distinguish the attachment from the rest of the text, we need to pass a parameter with the key value pair identifying the attachment, and then we can attach it to the message and send the email the same way we did previously.
attachment_part.add_header(
    'Content-Disposition',
    f'attachment; filename= {pdf_to_attach.name}',
)

message.attach(attachment_part)

with smtplib.SMTP_SSL(gmail_smtp_url, port, context=context) as gmail_server:
    gmail_server.login(gmail_username, gmail_password)
    gmail_server.sendmail(
        gmail_username, receiver_email, message.as_string()
    )
Hopefully you should now have an email in your inbox with the same text as before, but also the PDF attached!
Using Templates to Present a Polished Front
A few months ago, my team had been asked in to help put together a sample and help report the results (something similar to the free coffee rate sample I wrote about previously). To keep the executives up to date, other folks on the project had been attaching a basic Excel sheet to a weekly email and pasting a table into Outlook from Excel. The sample was good, the data was pretty good, the results in each email were final, but executives kept replying before meetings and press conferences asking for the official results. Our initial thought was that a professional and pretty email would help them trust the results without the need for any reassurance.
There are plenty of online services to help you send nicely formatted emails, sometimes even with convenient APIs (Mailchimp would be a good example), but in a corporate environment with procurement practices better set up for multimillion dollar contracts, these services may not be a realistic option.
Enter the MailJet Markup Language (MJML):
"The only framework that makes responsive email easy"
HTML and CSS support in email clients is pretty varied and lackluster in comparison to web browsers, which makes creating HTML emails more like web development in 2008 than in the modern day. Writing MJML (mostly) abstracts away those problems, and compiles to an HTML email with special handling for most email clients. Once you get the hang of it, it's pretty easy to put together a polished email template and test it in a an hour or two (once the design and any creative assets are finished).
There is a brief MJML intro on the official site, but it stays pretty basic unless you go directly to the documentation page. For this example, we will create a basic email with a logo on top, and show how to load the logo as an attachment if you cannot host the image on a server.
Even though it is its own language, it should very familiar to anyone who's worked with HTML and CSS before. The entire file is wrapped in an mjml tag, with head and body sections. Similar to a regular webpage, the head is not rendered directly and is instead where you put metadata or define attributes (the default styling for mjml components, like specifying the default text size and color throughout the rest of the email).
<mjml>
  <mj-head>
    <mj-title>Set the title, usually for accessibility tools</mj-title>
    <mj-preview>Set inbox preview text here, otherwise it might be something nonsensical</mj-preview>
    <mj-attributes>
      <mj-all font-family="Helvetica, Arial, sans-serif"></mj-all>
      <mj-text font-weight="400" font-size="16px" color="#4A4A4A" line-height="24px" />
      <mj-section padding="0px"></mj-section>
    </mj-attributes>
  </mj-head>
  <mj-body>
  </mj-body>
</mjml>
Putting together the rest of the email is pretty straightforward, using sections (the <mj-section> tag). Each section needs to have at least one column (the <mj-column> tag), although you can try and have multiple columns too. Before getting too fancy though, unfortunately support for showing multiple columns next to one another is iffy in many email clients.
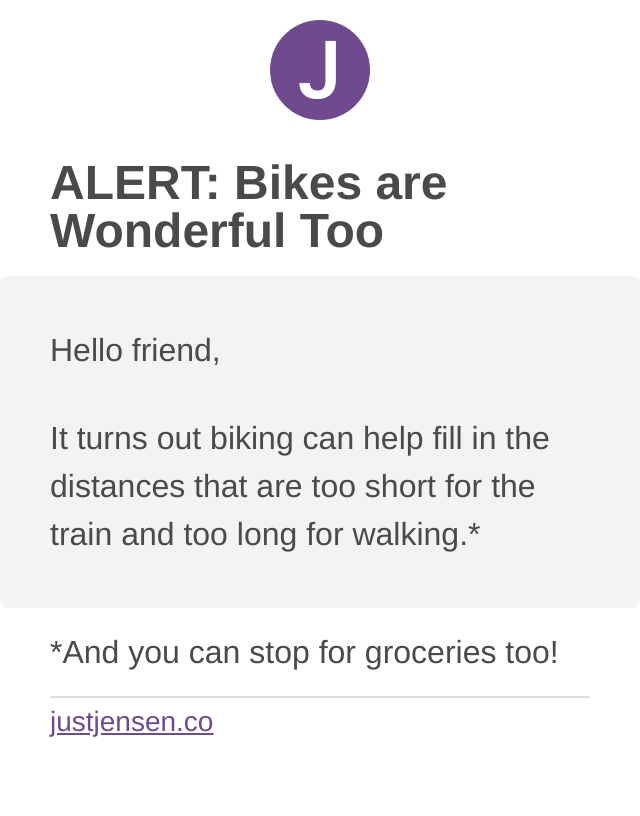
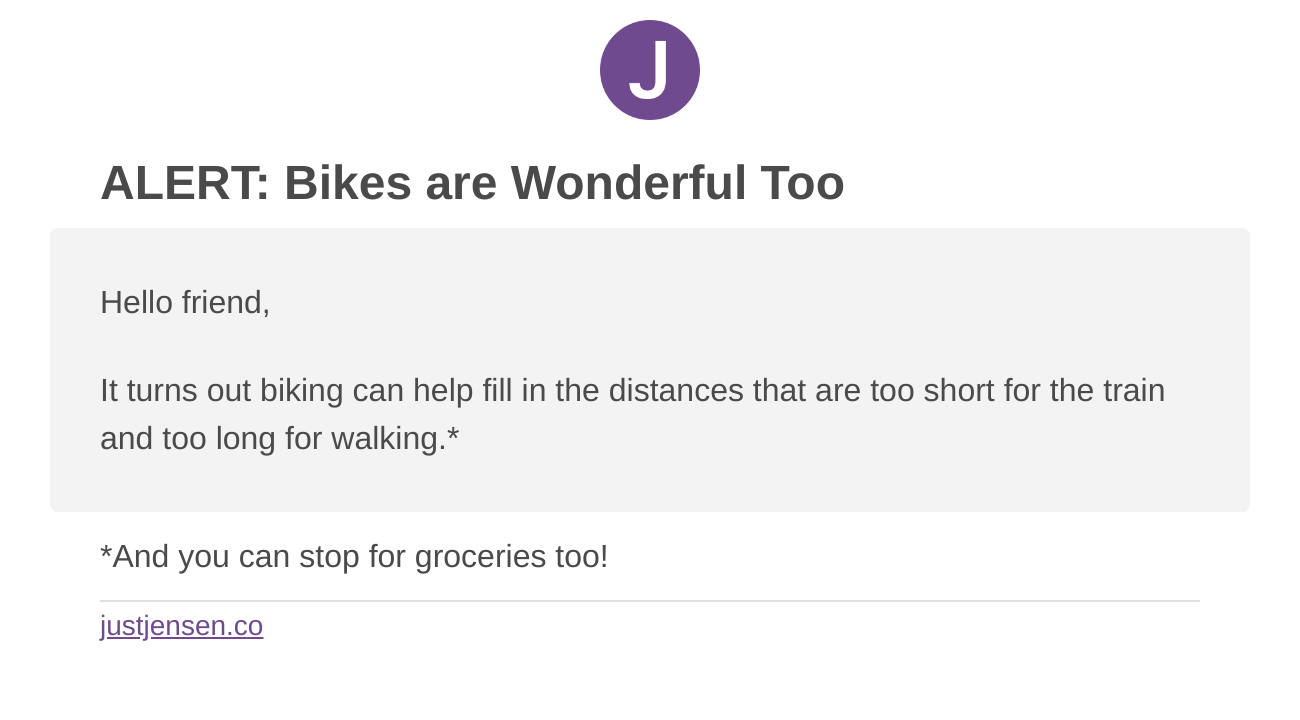
Completing the email with an image, some notification text, and a divider looks pretty good.
<mjml>
  <mj-head>
    <mj-title>Set the title, usually for accessibility tools</mj-title>
    <mj-preview>Set inbox preview text here, otherwise it might be something nonsensical</mj-preview>
    <mj-attributes>
      <mj-all font-family="Helvetica, Arial, sans-serif"></mj-all>
      <mj-text font-weight="400" font-size="16px" color="#4A4A4A" line-height="24px" />
      <mj-section padding="0px"></mj-section>
    </mj-attributes>
  </mj-head>
  <mj-body>
    <mj-section>
      <mj-column>
        <mj-image src="https://justjensen.co/content/images/2020/08/ghost-blog-logo.png" alt="JustJensen Logo" align="center" width="50px"></mj-image>
        <mj-text font-size="24px" align="left" font-weight="800" line-height="24px">ALERT: Bikes are Wonderful Too</mj-text>
      </mj-column>
    </mj-section>
    <mj-section>
      <mj-column width="100%" background-color="#f3f3f3" border-radius="4px" padding-top="15px" padding-bottom="15px">
      <mj-text>Hello friend,</mj-text>
      <mj-text>It turns out biking can help fill in the distances that are too short for the train and too long for walking.*</mj-text>
      </mj-column>
    </mj-section>
    <mj-section>
      <mj-column>
        <mj-text>*And you can stop for groceries too!</mj-text>
      <mj-divider border-width="1px" border-color="#E0E0E0" padding-bottom=0 padding-top=0></mj-divider>
      <mj-text font-size="14px" padding-top=0><a href="https://justjensen.co" style="color:#6f4a8e">justjensen.co</a></mj-text>
      </mj-column>
    </mj-section>
  </mj-body>
</mjml>
If you compile this to HTML using the MJML app or VSCode extension, you should get something that looks like this:
Personalizing the Template and Sending with Python
Now that we have our wonderful template email, you might want to add some custom text to it before sending it with Python. The easiest way I could find to do this was using the Mustache templating system (the Python implementation is called pystache).
While you can do a lot more with Mustache, for this example we'll just include a first name. For basic text, all you need to do is wrap your variable name with double curly brackets like this {{first_name}}. Start by editing your MJML template with the double curly brackets and then export it to HTML with the MJML app or VSCode:
    <mj-section>
      <mj-column width="100%" background-color="#f3f3f3" border-radius="4px" padding-top="15px" padding-bottom="15px">
      <mj-text>Hello {{first_name}},</mj-text>
      <mj-text>It turns out biking can help fill in the distances that are too short for the train and too long for walking.*</mj-text>
      </mj-column>
</mj-section>To use the template and fill in the variable, we'll need to adjust our Python code from above a little bit.
import pystache

# read in the email template, remember to use the compiled HTML version!
email_template = (Path() / 'email_template.html').read_text()

# Pass in values for the template using a dictionary
template_params = {'first_name': 'JustJensen'}

# Attach the message to the Multipart Email
final_email_html = pystache.render(email_template, template_params)
message.attach(MIMEText(final_email_html), 'html')

"""Continue with sending..."""
Assuming the image lives on a server, you can pass URLs in with pystache, and you should be ready to send everything out! If you want to make sure that users always have the images available and don't need to load external content, then we'll need to include the images as an attachment instead.
Including the Logo as an Attachment
If you don't have access to a public server with which to host your attachments (or if your recipient's corporate firewall will block them), then you can include any images in your email as attachments and reference them inline. I found the best way to do this was to give them a "Content-ID" when attaching them to the email and then modifying the MJML script to look for the correct image to display. To get started, let's modify the MJML template.
    <mj-section>
      <mj-column>
        <mj-image src="cid:{{logo}}" alt="JustJensen Logo" align="center" width="50px"></mj-image>
        <mj-text font-size="24px" align="left" font-weight="800" line-height="24px">ALERT: Bikes are Wonderful Too</mj-text>
      </mj-column>
    </mj-section>
We now need to prepare the Python script to attach the image and pass in the correct information, assuming the logo is stored in the same folder as the script.
# First get the logo and prepare it for the attachment
logo_path = Path() / 'justjensen_logo.png'
logo = logo_path.open()
logo_img = MIMEImage(logo_path.read_bytes())
logo.close()
logo_img.add_header('Content-ID', f'<{logo_path.name}>')

# Now adjust the pystache dictionary to handle both variables
template_params = {'first_name': 'JustJensen',
                   'logo': logo_path.name}

# Render the email template and attach the image to the message
final_email_html = pystache.render(email_template, template_params)
message.attach(MIMEText(final_email_html), 'html')
message.attach(logo_img)
If you've been following along the entire way, once you slot this last remaining code snippet into your script, you should be able to send yourself a message with a professionally formatted email with inline images that don't rely on server hosting and an attached PDF report.
Final Thoughts
While it requires a frustrating number of dependencies and packages to put together, the first two or three automatic emails we created with this tech stack were thankfully a pretty big hit. Creating the professional template cut down significantly on requests for "official numbers" and we found that upper management was far more likely to self serve statistics by searching through their emails for our last update rather than going to a dashboard (which would also require searching through their emails, with the added steps of connecting to the corporate network and clicking a link).
After giving a presentation on the full development process of a new email/PDF combination, my boss did ask whether we could simplify how an email is created. I chose to use Rmarkdown to get access to GGPlot and Knitr (since it supported LaTeX PDF output). This was partly because I already had experience with these tools, but also because GGPlot remains more or less the best static 2D data viz library, and LaTeX has more or less the best typesetting engine outside of professional layout tools like Adobe InDesign (that are harder to automate with scripts and cost money). Using something like WeasyPrint or Jinja2 templates with a data viz library like seaborn or Altair will get you 80-90% of the way there without requiring any R knowledge.
At this point, none of our recipients are getting more than two of our fancy new emails, but we are trying to pay attention to the possibility of email fatigue. Eventually we will cross a threshold where they start to blend together, even with distinctive styling using MJML. At that point we'll probably consolidate some of the different emails together and get rid of others after reaching out to all the stakeholders for feedback.
It's worth noting that at no point in this did I cover tracking how often users open our emails or click through our links to dive deeper using dashboards. At my office we don't have a good way of reliably tracking how users use emails, and generally it's been pretty easy through feedback sessions to figure out what recipients find useful/actionable and what they don't.
Probably the biggest "downside" to overhauling our email reporting has been that now we have a lot of requests from other groups for their own emails in this new style. We automated the emails to save time, and now those time savings are going into developing more automated emails. In the end though, this is a good problem to have, and it means that less technical people at the agency can appreciate the great analysis work that my team members and coworkers do.